Saturday, July 1, 2017

DIY Tutu Chandelier

Recently, I saw an adorable tutu chandelier on pinterest that I am totally obsessed with.  Since I am pretty crafty, I figured that this was a challenge I was willing to take on.  However, I scoured the internet and could not find any blogs on how to make the exact one I wanted.  After checking out a number of blogs, I pieced together how to make this cute chandelier and wanted to share it with you.  Here is the link to my inspiration: tutu chandelier

Items Needed:

  • 12 inch wire wreath.  I got mine at Wal Mart for $2 but you can find on Amazon here: wire wreath
  • Spray Paint (whatever color tulle you are using)- purchased at Wal Mart but you can find similar on Amazon here: spray paint
  • 8 yards of tulle- Purchased at Jo Ann Fabric
  • Crystals- I opted for two different sizes on Amazon.  You can find on Amazon here: 18 mm and 14 mm
  • Fishing line- 20 lb and 6 lb- Purchased at Wal Mart


Step 1:
Spray paint your wire wreath.  You will probably need more than 1 coat on each side.  My amazing husband helped with this part.  Allow about 2 days for this step so you can allow the paint to fully dry on each side between coats.


Step 2:
Attach the 20 lb fishing line to each of the 6 "cross bars" of the wreath.  Each crossbar should have a "bump" between the second and third rung, and you will want to tie it to that.  Make sure to tie a few knots on each strand since you don't want this falling down and hurting someone later. Make each strand 1.5- 2 ft. long (depends on your ceiling height).  Once you have tied the fishing line on all 6 bumps, tie all six strands together at the top.  Make sure each strand is the same length, or your chandelier will hang off center.  Note- you can also do this after step 5.  You just need to make sure you complete it before you start attaching beads.   

Step 3:
Cut your tulle.  Since I was figuring things out, I cut as I went instead of cutting all pieces upfront.  What I learned is that for the outermost rung, you need the shortest strips of tulle, and as you work your way to the inside, they need to be longer.  All strips should be about 2 inches wide although I included some 3 inch cuts for variety.  Note- I wanted an aggressively fluffy tutu so I opted to cover all four circles.  For a less full tutu, you can skip putting tulle on one or two of the circles.   

Outer Circle: 6 inches long
Second Circle: 7 inches long
Third Circle: 8 inches long
Inner Circle: 9 inches long


Step 4:
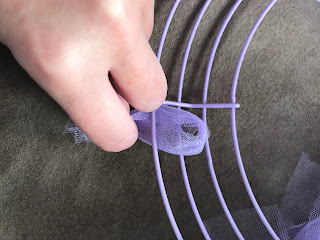
Starting on the outermost circle, make some knots.  In order to do that, take 3 strips of tulle to make a bundle and bend the bundle in half.  Put the loop side of the bundle under the wire and then wrap the ends around and slide through the loop.  Pull tight to make a knot. 


Go around the entire outer circle knotting the bundles to the wreath.  Every so often, I would put a bundle of 2 pieces of tulle on the wreath instead of the standard 3.  Each section (there are 6 sections) of the outermost circle will have about 15 bundles knotted to it.

Step 5:
Move to the second circle.  For this circle, tulle strips should be 7 inches long.  Knot the first and second bundles of tulle as you had in on the outermost circle.  However, on the second bundle that you knot, flip the direction downward.  You will need to to this to get a full look on both sides.  Alternate one bundle up and one bundle down around the second circle.  For this circle, you will have about 13 bundles in each section.  Continue this process for the third circle and the inner circle.  For the third circle, bundles should be 8 inches in length, and you will have about 11 bundles per section.  For the inner circle, bundles should be 9 inches in length, and you will have about 9 bundles per section.  Note- I followed the same process as I did for the outermost circle in that every so often, I would put a couple bundles of 2 pieces of tulle in the mix.    


Once you finish knotting all your circles, the tutu part of the chandelier should look like this:


Step 6: 
Now you are ready to start putting together the hanging strands of beads.  For this part, you will want to make sure that you have somewhere to hang the tutu while you hang the beads so the strands do not get tangled.

You will need about 6 strands of beads for each section- 3 on the outermost rung and 2-3 on the inner most rung.  I used 34 strands in total (18 on the outer rung and 16 on the inner)

Divide out all your beads into 34-36 piles.  I tried to do 3-6 beads on each strand with the majority of strands having 4 beads.

Step 7:
Utilizing your first pile of beads, select one and string the 6 lb fishing line through the hole.  Tie a few knots to make sure that it is secure.  I probably went overboard and tied 7-8 knots.  Cut the fishing line at any desired length.  Since this will be the bead closest to the tutu, you will want to make this part extra long so you can tie this to the wreath later.


Continue stringing/knotting beads to make your strands.  You will want the look to be a bit random, so no need to measure each one precisely.  I elected to make my strands between 16-24 inches long in total but you will want to do what is right for your space.


Step 8:
Once you have made all your strands, start tying them to the wreath.  These strands tangle easily, which is why you will hang them from the outermost rung and the inner most rung and skip the two rungs in the middle.  You will hang 18 strands from the outermost rung (3 in each section) and 16-18 from the inner most (2-3 in each section).

Then Voila!  You are done!!!!!!


Thank you to those who wrote such amazing blogs that helped me piece together how to make this.

Crystal Chandelier with Ruffle 
Tulle Wreath

Sunday, March 11, 2012

Glitter Bottles

For those of you who know me, you know I love anything sparkly.  Growing up as a child I put glitter on everything.  Book reports, school projects, you name it there was glitter on it.  So when I saw this project on Pinterest, I knew this was right up my alley.  This project is so easy to do and takes about 5 minutes.  Today I have my lovely sister, Kristen assisting with this craft.   

Items you will need:
Pledge Floor Care Finish
Bottles (you can find these at Michael's for 99 cents)
Glitter- I got this whole canister at Wal Mart for $4

Step One: Pour the Pledge Floor Care Finish into your bottle

Step 2: Swirl the Pledge around the inside of the bottle making sure you coat the entire inside
Step 3: Dump out any excess liquid
Step 4: Pour a generous amount of glitter into your bottle.  If you are using two colors of glitter, you have one of two options.  If you want the colors equally distributed, mix the colors together before you dump them into the bottle.  If you want the colors to be more swirled, dump each color of glitter into the bottle
Step 5: Slowly swirl the glitter around the inside of the bottle until the whole inside s covered.  You can add more glitter as necessary.
Step 6: Dump out excess glitter. 

Note- if you are not happy with your results, all you have to do is rinse out the inside of the bottle with water, and all of the glitter will come out.  Then you can repeat steps 1-6 again.


Voila!  You have a glitter bottle.  I have one displayed on my bookcase.  I have also seen people use these as vases (fake flowers only!)  For extra jazz, you can either buy a bottle stopper with a jeweled top or you can glue a jewel on yourself. I bought the bottle like this and really love the added sparkle of the jewel.


Saturday, March 10, 2012

Beaded Necklace

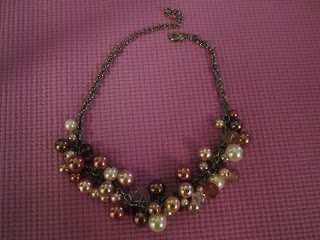
So, when I was home at my parent's house, I found a beautiful yellow dress that is perfect to wear to work, on weekends, etc. (yeah tax free clothes in PA!)  With the new trends this season, I thought an electric blue necklace with green accents would be perfect to wear with the dress.  I searched high and low and could not find a necklace that I liked and was in my price range.  So, I figured why not make it?  My inspiration was this other necklace I had bought at a department store which I love and get lots of compliments on (pictured below).


 Normally, I love bling bling (clearly I am my Grammy's granddaughter), so the necklace I am going to teach you how to make will have lots more sparkle and shine.  Here goes...


Items you will need:
Small pliers
Wire Cutters- Note I would not recommend the pliers or wire cutters in this picture.  I actually had to return them.  Your best bet is buying them at Home Depot.  I bought a set for $13 that worked much better.
Chain (I used an 18 inch one)
Headpins
Jump Rings (not pictured)
Clasp
Beads of your choice (make sure the holes are small so the headpins will stay in)

Step 1: Attach clasp to the end of your chain by using a jump ring
Step 2: Put headpin through the hole of the bead
Step 3: Clasp the pliers around the headpin close to the base of the bead.  This was one of the first ones I did so I was still learning.  As I went on, I learned that the headpin bends better if you give a tiny bit of space between the pliers and the top of the bead. 
Step 4: Bend the headpin down over the top of the pliers
Step 5: Bend the straight part of the headpin around the part of the headpin close to the base of the bead to start creating your loop.
Step 6: Continue bending the headpin until you have a full circle at the base of the bead.  You may need to play with the position of the pliers during this step. Note- since I posted this I took a jewelry class and this is not exactly the correct technique...but you get the idea.
Step 7: Cut the excess wire from the headpin.  Use pliers to push edge of headpin toward the circle at the base of the bead as needed
Step 8: Take a jump ring and open it with the pliers so you can put the loop you just created with the headpin inside it
Step 9: String the jump ring through the chain of your necklace and squeeze the loop closed with your pliers
Step 10: Repeat steps 1-9 until your necklace is full of beads as desired.

  • I put a larger bead in every other link and then two small beads in every other link.  
  • I used various sized jump rings to affix the beads to the chain so the beads fell at different lengths.  
  • I started beading the chain at about 4 inches on the left.  
  • The section I beaded was about 9 inches.  You will notice that those dimensions make the beaded part of the necklace not centered.  However, different shirts and clothes call for you to wear the necklace at different lengths, so you want to leave extra chain on one side so you can adjust the length as necessary (I left 5 inches on the right)
Step 11: Add a small bead to the end of the chain without the clasp for an added pizazz

Now you have a beautiful piece of art you can wear! (And please note in the sunlight it is very sparkly- just as I had intended.  I hope I am making my grandmother proud right now).  And of course, I want to give a special shout out to my mother who is also very crafty herself and supported my creativity over the years.

For those of you who are not crafty, I am selling these necklaces on Etsy and can be found here:  http://www.etsy.com/people/PartybyNicole

Wednesday, March 7, 2012

About Me

During the course of my life, I would like to consider myself fairly crafty.  In college, I even went so far as to paint Van Gogh's "Starry Night" on a picture frame (it took two solid days).  We recently bought a house so I have picked up crafting again.