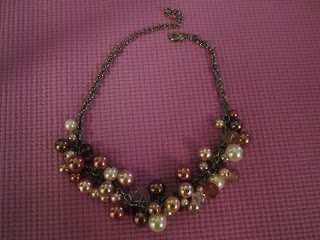
Normally, I love bling bling (clearly I am my Grammy's granddaughter), so the necklace I am going to teach you how to make will have lots more sparkle and shine. Here goes...
Items you will need:
Small pliers
Wire Cutters- Note I would not recommend the pliers or wire cutters in this picture. I actually had to return them. Your best bet is buying them at Home Depot. I bought a set for $13 that worked much better.
Chain (I used an 18 inch one)
Headpins
Jump Rings (not pictured)
Clasp
Beads of your choice (make sure the holes are small so the headpins will stay in)
Step 1: Attach clasp to the end of your chain by using a jump ring
Step 2: Put headpin through the hole of the bead
Step 3: Clasp the pliers around the headpin close to the base of the bead. This was one of the first ones I did so I was still learning. As I went on, I learned that the headpin bends better if you give a tiny bit of space between the pliers and the top of the bead.
Step 4: Bend the headpin down over the top of the pliers
Step 5: Bend the straight part of the headpin around the part of the headpin close to the base of the bead to start creating your loop.
Step 6: Continue bending the headpin until you have a full circle at the base of the bead. You may need to play with the position of the pliers during this step. Note- since I posted this I took a jewelry class and this is not exactly the correct technique...but you get the idea.
Step 7: Cut the excess wire from the headpin. Use pliers to push edge of headpin toward the circle at the base of the bead as needed
Step 8: Take a jump ring and open it with the pliers so you can put the loop you just created with the headpin inside it
Step 9: String the jump ring through the chain of your necklace and squeeze the loop closed with your pliers
Step 10: Repeat steps 1-9 until your necklace is full of beads as desired.
- I put a larger bead in every other link and then two small beads in every other link.
- I used various sized jump rings to affix the beads to the chain so the beads fell at different lengths.
- I started beading the chain at about 4 inches on the left.
- The section I beaded was about 9 inches. You will notice that those dimensions make the beaded part of the necklace not centered. However, different shirts and clothes call for you to wear the necklace at different lengths, so you want to leave extra chain on one side so you can adjust the length as necessary (I left 5 inches on the right)
Now you have a beautiful piece of art you can wear! (And please note in the sunlight it is very sparkly- just as I had intended. I hope I am making my grandmother proud right now). And of course, I want to give a special shout out to my mother who is also very crafty herself and supported my creativity over the years.
For those of you who are not crafty, I am selling these necklaces on Etsy and can be found here: http://www.etsy.com/people/PartybyNicole


Wow that is so pretty!!!! Good work!
ReplyDeleteAll your pieces were lovely! This one is pinned on my "Stirrings of a Magpie" board at pinterest. I can't wait for you to make mine. I have a brand new dress just waiting for that necklace... Joyce
ReplyDeleteGlad you like it, Joyce! I started yours tonight so it will be done in the next couple of days. I plan on sending a shipment to Carol by the middle of this week.
ReplyDelete